I've learnt from experience that people tend to get repelled from programs using bitwise operators especially the bit shifts. I, however, find a program which uses bitwise operators neater and cool.
A bit of the background before we begin. I assume that you know a bit about Number Systems (Binary and Hexadecimal). I use Java syntax in this article just to clear the concept of signed and unsigned right shift but the concepts in general are applicable to any programming language.
Bitwise Operators
AND
0 & 0 = 0
0 & 1 = 0
1 & 0 = 0
1 & 1 = 1
The result is 1 when both operands are 1, 0 otherwise.
OR
0 | 0 = 0
0 | 1 = 1
1 | 0 = 1
1 | 1 = 1
The result is 1 when either of the operands is 1.
NOT
!0 = 1
!1 = 0
The result is the inverse of input i.e. 0 becomes 1 and vice versa.
XOR
0 ^ 0 = 0
0 ^ 1 = 1
1 ^ 0 = 1
1 ^ 1 = 0
The result is addition modulo 2 i.e. 1 when exactly one of the operands is 1.
Bit Shifts
For further examples let us take a variable x:
int x=5;
As we know an integer takes 32 bit memory so x in binary is:
binary(x) = 00000000000000000000000000000101
Left Shift <<
It shifts the bits of the number to left the specified amount of times and zeros are padded to the right.
For instance let us try shifting 2 bits of x to left.
x = x<<2;
binary(x) = 00000000000000000000000000010100
decimal(x) = 20
We see that on shifting left by each bit the number is doubled and because we shifted x by 2 bits it has quadrupled i.e. 5*4 = 20.
Unsigned Right Shift >>>
It shifts the bits of the number to right the specified amount of times and zeros are padded to the left.
For instance let us try shifting 3 bits of x to right.
x = 64;
binary(x) = 00000000000000000000000001000000
x = x>>>3;
binary(x) = 00000000000000000000000000001000
decimal(x) = 8
As we see the bits have been shifted 3 places to the right and zeros are padded to the beginning of the binary string. The bits that overflow to the right are discarded and lost and cannot be recovered by a left shift. Each right shift halves the number so a shift of 3 bit will convert it to one-eighth i.e. 64/8 = 8.
The name of this shift operator is unsigned because it does not depend on the sign of the number. We'll see what that means in the next shift operator.
Signed Right Shift >>
It shifts the bits of the number to right the specified amount of times and pads zeroes or ones to the left if the number is positive or negative respectively.
int x = 64;
binary(x) = 00000000000000000000000001000000
x = x>>3;
binary(x) = 00000000000000000000000000001000
decimal(x) = 8
int y = -73;
binary(y) = 11111111111111111111111110110111
y = y>>3;
binary(y) = 11111111111111111111111111110110
decimal(y) = -10
As we see the that a signed shift on a positive number is exactly the same as an unsigned shift but in case of a negative number the left is padded with 1s instead of 0s.
Implementation
You may have seen color codes written in hexa-decimal like 0xFFAB274F or #AB274F which by the way is the hex of Amarnath Purple.
Let us extract the red, green, blue and alpha values from this hex using our knowledge of bitwise operators.
int purple = 0xffab274f;
binary(purple) = 11111111101010110010011101001111
Now, we know that the first 8 bits are the alpha (ff), next 8 bits are the red (ab), next 8 bits are the green (27) and the last 8 bits are blue (4f).
We know that binary(0xff) = 11111111 = 255.
Now, if we shift 24 bits to the right (unsigned) then we are left with the first 8 bits which is the alpha value.
Then, if we shift 16 bits to the right (unsigned) then we are left with the first 16 bits which is the alpha value + the red component of the color. So, how do we extract the red component? Simply & the value with 0xff.
int purple = 0xffab274f;
int alpha = purple>>>24;
binary(alpha) = 11111111
int alpha_and_red = purple>>>16;
binary(alpha_and_red) = 1111111110101011
Now, let see how to get red from alpha_and_red. We & it with 0xff which is 0000000011111111 and because the & of anything with 0 is zero we get only the red bits as a result. Here's how:
int red = alpha_and_red & 0xff;
  1111111110101011
& 0000000011111111
  ----------------
  0000000010101011
We can see we only get red bits as output and others are discarded. We can do similar things for blue and green.
Here's the code snippet in java:
int color = 0xffab274f;
int alpha = color >>> 24;
int red = (color >>> 16)&0xff;
int green = (color >>> 8)&0xff;
int blue = (color)&0xff;
Lambda Expressions is an addition to Java which has caught everyone's attention. It is an interesting addition which will make code look cleaner and a bit smaller. To sum it up in one sentence - Lambda Expressions are a short-cut for implementing function interfaces.
What is a function interface?
A functional interface is an interface which has only one abstract method. Some common examples are Runnable, ActionListener etc.
How we used them earlier?
By implementing it to a Class.
class FunctionalInterface1 implements Runnable {
  @Override
  public void run() {
    System.out.println("Hello from Thread!");
  }
  public void startThread() {
    Thread thread=new Thread(this);
    thread.start();
  }
  public static void main(String[] args) {
    new FunctionalInterface1().startThread();
  }
}
By using Anonymous Classes.
class FunctionalInterface2 {
  public void startThread() {
    Thread thread=new Thread(new Runnable() {
      @Override
      public void run() {
        System.out.println("Hello from Anonymous Class!");
      }
    });
    thread.start();
  }
  public static void main(String[] args) {
    new FunctionalInterface2().startThread();
  }
}
How to use Lamda Expressions?
Lambda Expressions have now made life easier by reducing by reducing it to a single line process. Here we go:
class LambdaTest {
  public static void main(String args[]) {
    Runnable r = () -> System.out.println("Hello from Lambda!");
    r.run();
  }
}
Just that much? Yes. Because a functional interfaces just has one abstract function, the () in the above code refers to the same function, run() in the case of Runnable.
The syntax of a Lambda Expression is
(args) -> Statement(s);
So, now you don't need to write tedious Anonymous classes for button ActionListener. You can simply write
Yes, you don't need to even mention the type of e (ActionEvent) in the expression, JDK 8 understands it all.
In the following example I give examples of custom functional interfaces
interface OneOperandFunction {
  public double compute(double a);
}
interface TwoOperandFunction {
  public double compute(double a, double b);
}
public class CustomLambdas {
  public static void main(String args[]) {
    double x = 0.9, y = 56.8;
    // No need to use return if you use no braces.
    OneOperandFunction cube = a -> a*a*a;
    // Use braces for multi-line Lambdas with a return statement
    TwoOperandFunction expression = (a,b) -> {
      double c = a*a;
      double d = b-10;
      return c*d;
    };
    System.out.println(cube.compute(x));
    System.out.println(expression.compute(x,y));
  }
}
The above code has two functional interfaces OneOperandFunction and TwoOperandFunction. The first one performs operations on one operand and the second one does the same on two operands.
You however won't create any new functional interfaces because JDK8 has made a lot of templates for you in the java.util.function package. A few of them are
Consumer<T> - Represents an operation that accepts a single input argument and returns no result.
Function<T,R> - Represents a function that accepts one argument and produces a result.
Predicate<T> - Represents a predicate (boolean-valued function) of one argument.4) Supplier<T> - Represents a supplier of results.
UnaryOperator<T> - Represents an operation on a single operand that produces a result of the same type as its operand. 6) BinaryOperator<T> - Represents an operation upon two operands of the same type, producing a result of the same type as the operands.
The Newton Rapshon method is used in mathematics to find approximations to the roots of an equation. f(x) we approximate a such that f(a)=0 and a is called the root of the equation. Newton's method can be applied on any equation but it is generally used on equations for which the calculation of the root is otherwise difficult.
Let me present an illustration of the beauty of Newton's method to show how fast it converges to the root. We make a guess about the root of f(x). Let the guess be a0. Then we pass a0 iteratively into the following function:
after few iterations we get a very close approximation of the exact root. For a demonstration, let the function be: f(x) = x2-10. Now we know that the square root of 10 is 3.16228 but let's see how good the Newton's method approximates it.
which is a root of the equation and we found it in just two iterations. Newton's method depends on how good your initial approximation was and converges very fast to the actual root. If however you start with a bad approximation, more interesting things will happen which are the base of this beautiful fractal.
Similarly, the Newton's method can be applied to complex equations. The basic algorithm of this method is:
Loop through each pixel of the image.
For each pixel, scale the (x,y) in range [-2.5,2.5] and make a complex number scaled_x + (scaled_y)i which corresponds to a0.
Pass this a0 iteratively to the Newton's function and loop until the root is found or a set number of MAXIMUM_ITERATIONS are reached.
After this there are many ways to color it like by the number of iterations taken or by the nearest root or using both of these.
Let's start by the simplest of them.
Number of Iterations -> Hue Mapping
In this method we map the number of iterations to a hue from [0˚,360˚] or [0,1] keeping the saturation and brightness constant and color the pixel accordingly. Here's is the code for making the fractal for z5-1. The code can be easily tweaked to make fractals of any degree of type zn-1.
Note: The classes used in the code can be found on GitHub
import fractals.math.ComplexNumber;
import java.io.IOException;
import java.io.BufferedReader;
import java.io.File;
import java.io.InputStreamReader;
import javax.imageio.ImageIO;
import java.awt.Color;
import java.awt.image.BufferedImage;
import fractals.util.MiscUtils;
import static java.lang.System.out;

// The fractal package can be found here https://github.com/abdulfatir/fractal-library

public class NRHueMapping {
  private static final String USAGE = "java NRHueMapping WIDTH HEIGHT";
  private static final int MAX_ITERATIONS = 32;
  private static final double EPSILON = 0.000001;

  static void printUsage() {
    System.out.println(USAGE);
  }

  static boolean isRoot(ComplexNumber z) {
    z = ComplexNumber.pow(z,5);
    z.subtract(new ComplexNumber(1,0));
    return Math.abs(z.mod()) < EPSILON;
  }

  public static void main(String args[])throws IOException {
    double WIDTH = 0;
    double HEIGHT = 0;
    try {
      WIDTH = Double.parseDouble(args[0]);
      HEIGHT = Double.parseDouble(args[1]);
    } catch(NumberFormatException nfe) {
      printUsage();
      System.exit(1);
    }
    catch(ArrayIndexOutOfBoundsException aiob) {
      printUsage();
      System.exit(1);
    }
    float hue = 0f;
    float saturation = 1f;
    float brightness = 0.95f;

    BufferedImage fractal = new BufferedImage((int)WIDTH, (int)HEIGHT,BufferedImage.TYPE_3BYTE_BGR);

    out.println("[*] Rendering ...");
    long start_time_stamp = System.currentTimeMillis();
    for(int X=0; X<WIDTH; X++) {
      for(int Y=0; Y<HEIGHT; Y++) {
        // Scaling to [-2.5,2.5]
        ComplexNumber a = new ComplexNumber((X-WIDTH/2)/(WIDTH/5), (Y-HEIGHT/2)/(HEIGHT/5));
        int iteration = 0;
        for(; iteration<MAX_ITERATIONS; iteration++) {
          // Calculating f(x)
          ComplexNumber f = ComplexNumber.pow(a,5);
          f.subtract(new ComplexNumber(1,0));
          // Calculating f'(x)
          ComplexNumber df = ComplexNumber.pow(a,4);
          df.multiply(new ComplexNumber(5,0));
          // a-f(a)/f'(a)
          a.subtract(ComplexNumber.divide(f,df));
          if(isRoot(a))
            break;
        }
        // Mapping no. of iterations to hue
        hue = (float)iteration/MAX_ITERATIONS;
        fractal.setRGB(X,Y, Color.getHSBColor(hue, saturation, brightness).getRGB());
      }
    }
    ImageIO.write(fractal ,"PNG", new File("huemappedNR.png"));
    long time_taken = System.currentTimeMillis() - start_time_stamp;
    out.println("Render Time: " + MiscUtils.formatTime((int)time_taken));
  }
}
Two examples of fractals drawn using the above code are:
Number of Iterations -> Grayscale Mapping
In this method we map the number of iterations to shades of gray.
Here's is the code for making the fractal for z3-1. The code can be easily tweaked to make fractals of any degree of type zn-1.
import fractals.math.ComplexNumber;
import java.io.IOException;
import java.io.BufferedReader;
import java.io.File;
import java.io.InputStreamReader;
import javax.imageio.ImageIO;
import java.awt.Color;
import java.awt.image.BufferedImage;
import fractals.util.MiscUtils;
import static java.lang.System.out;

// The fractal package can be found here https://github.com/abdulfatir/fractal-library

public class NRGrayMapping {
  private static final String USAGE = "Usage:\tjava NRGrayMapping WIDTH HEIGHT";
  private static final int MAX_ITERATIONS = 32;
  private static final double EPSILON = 0.000001;

  static void printUsage() {
    System.out.println(USAGE);
  }

  static boolean isRoot(ComplexNumber z) {
    z = ComplexNumber.pow(z,3);
    z.subtract(new ComplexNumber(1,0));
    return Math.abs(z.mod()) < EPSILON;
  }

  public static void main(String args[])throws IOException {
    double WIDTH = 0;
    double HEIGHT = 0;
    try {
      WIDTH = Double.parseDouble(args[0]);
      HEIGHT = Double.parseDouble(args[1]);
    } catch(NumberFormatException nfe) {
      printUsage();
      System.exit(1);
    }
    catch(ArrayIndexOutOfBoundsException aiob) {
      printUsage();
      System.exit(1);
    }

    BufferedImage fractal = new BufferedImage((int)WIDTH, (int)HEIGHT,BufferedImage.TYPE_3BYTE_BGR);

    out.println("[*] Rendering ...");
    long start_time_stamp = System.currentTimeMillis();
    for(int X=0; X<WIDTH; X++) {
      for(int Y=0; Y<HEIGHT; Y++) {
        // Scaling to [-2.5,2.5]
        ComplexNumber a = new ComplexNumber((X-WIDTH/2)/(WIDTH/5), (Y-HEIGHT/2)/(HEIGHT/5));
        int iteration = 0;
        for(; iteration<MAX_ITERATIONS; iteration++) {
          // Calculating f(x)
          ComplexNumber f = ComplexNumber.pow(a,3);
          f.subtract(new ComplexNumber(1,0));
          // Calculating f'(x)
          ComplexNumber df = ComplexNumber.pow(a,2);
          df.multiply(new ComplexNumber(3,0));
          // a-f(a)/f'(a)
          a.subtract(ComplexNumber.divide(f,df));
          if(isRoot(a))
            break;
        }

        int shade = (int)(((float)iteration/MAX_ITERATIONS)*255);
        fractal.setRGB(X,Y, new Color(shade, shade, shade).getRGB());
      }
    }
    ImageIO.write(fractal ,"PNG", new File("graymappedNR.png"));
    long time_taken = System.currentTimeMillis() - start_time_stamp;
    out.println("Render Time: " + MiscUtils.formatTime((int)time_taken));
  }
}
Number of Iterations -> Custom Palette Mapping
In this method we map the number of iterations to a custom color palette.
Here's is the code for making the fractal for z5-1. The code can be easily tweaked to make fractals of any degree of type zn-1.
import fractals.math.ComplexNumber;
import fractals.graphics.Palette;
import java.io.IOException;
import java.io.BufferedReader;
import java.io.File;
import java.io.InputStreamReader;
import javax.imageio.ImageIO;
import java.awt.Color;
import java.awt.image.BufferedImage;
import fractals.util.MiscUtils;
import static java.lang.System.out;

// The fractal package can be found here https://github.com/abdulfatir/fractal-library

public class NRCustomMapping {
  private static final String USAGE = "Usage:\tjava NRCustomMapping WIDTH HEIGHT";
  private static final int MAX_ITERATIONS = 32;
  private static final double EPSILON = 0.000001;

  static void printUsage() {
    System.out.println(USAGE);
  }

  static boolean isRoot(ComplexNumber z) {
    z = ComplexNumber.pow(z,5);
    z.subtract(new ComplexNumber(1,0));
    return Math.abs(z.mod()) < EPSILON;
  }

  public static void main(String args[])throws IOException {
    double WIDTH = 0;
    double HEIGHT = 0;
    try {
      WIDTH = Double.parseDouble(args[0]);
      HEIGHT = Double.parseDouble(args[1]);
    } catch(NumberFormatException nfe) {
      printUsage();
      System.exit(1);
    }
    catch(ArrayIndexOutOfBoundsException aiob) {
      printUsage();
      System.exit(1);
    }

    BufferedImage fractal = new BufferedImage((int)WIDTH, (int)HEIGHT,BufferedImage.TYPE_3BYTE_BGR);

    int[] palette = Palette.toArray(512,
    new Color(255,255,255),
    new Color(0,0,138),
    new Color(0,0,0),
    new Color(172,88,6),
    new Color(255,255,255),
    new Color(255,255,255),
    new Color(0,0,138),
    new Color(0,0,154),
    new Color(0,0,0));

    out.println("[*] Rendering ...");
    long start_time_stamp = System.currentTimeMillis();
    for(int X=0; X<WIDTH; X++) {
      for(int Y=0; Y<HEIGHT; Y++) {
        // Scaling to [-2.5,2.5]
        ComplexNumber a = new ComplexNumber((X-WIDTH/2)/(WIDTH/5), (Y-HEIGHT/2)/(HEIGHT/5));
        int iteration = 0;
        for(; iteration<MAX_ITERATIONS; iteration++) {
          // Calculating f(x)
          ComplexNumber f = ComplexNumber.pow(a,5);
          f.subtract(new ComplexNumber(1,0));
          // Calculating f'(x)
          ComplexNumber df = ComplexNumber.pow(a,4);
          df.multiply(new ComplexNumber(5,0));
          // a-f(a)/f'(a)
          a.subtract(ComplexNumber.divide(f,df));
          if(isRoot(a))
            break;
        }
        float factor = ((float)iteration)/MAX_ITERATIONS;
        int index = (int)((palette.length-1)*factor);
        fractal.setRGB(X,Y, palette[index]);
      }
    }
    ImageIO.write(fractal ,"PNG", new File("custmappedNR.png"));
    long time_taken = System.currentTimeMillis() - start_time_stamp;
    out.println("Render Time: " + MiscUtils.formatTime((int)time_taken));
  }
}
All of these fractals are beautiful but a visible flaw in all of them is that the color transition is not continuous. In the upcoming articles I'll describe the removal of color edges, coloring by root and many more cool things. Stay tuned.
If you learnt something from this article, please share it. Sharing is caring.
In his book, Fractals Everywhere, Michael Barnsley writes
IFSs provide models for certain plants, leaves, and ferns, by virtue of the self-similarity which often occurs in branching structures in nature.
The concept of Iterated Function Systems was first given by John Hutchinson in 1981 and was later popularized by Michael F. Barnsley. The fractal which we are going to discuss in this article is named Barnsley Fern due to the contributions of Barnsley in this field.
What are IFSs?
Iterated Function Systems are a method of constructing fractals. They are called iterated because of the hundreds or thousands of iterations we perform on the image to get the final self repeating image i.e. the fractal. A method of rendering IFS fractals is called the chaos game which we will be discussing in this article. In this method random points are chosen and affine transformation functions are applied iteratively to those points which means the result of the current iteration becomes the input for the next iteration.
What is an Affine Transformation?
An affine transformation is a function which is used to perform scaling, reflection, rotation, shear and many other operations on points. An affine transformation does not necessarily preserve the angle between two lines but a set of parallel lines remain parallel after an affine transformation is applied to them.
An affine transformation is generally applied in the form of a matrix. In the following section I'll explain this with an example.
Suppose we have a point (x0,y0) in the co-ordinate plane then to the affine transformation to get the resulting point (x1,y1) the affine transformation is applied as follows:
where a,b,c,d,e and f are constants.
Let's take four points in 2D plane which represent a square with side 10 units: (0,0), (10,0), (0,10) and (10,10).
Now let's take affine transformation matrices with : a = 0, b = 1, c = 2, d =1, e = -10 and f = -10. The function can now be represented as:
Now we feed all the four points of the square to this function one by one. For example when we input (10,10) we get (0,20) as the output. When we join all the four output points we get an image very different from the input square. The following image shows this transformation graphically. The blue square is the original input and the red parallelogram is the outcome of the transformation:
This is how the affine transformation works.
So, how are the IFS fractals rendered?
We first define more than one affine functions (four for the classic Barnsley fern). Then we use the chaos game to choose random points in the image and apply one of the four affine functions and feed the result of this iteration to the next iteration. We render each output of the functions with a specific color and we get the resultant fractal.
Each affine function is represented as ω(x) = A.x+ t where A is the transformation matrix, x is the point (x,y) and t is translation matrix.
So, we're ready with our four functions but how do we know when to use which function or how often a function is to be used?
The answer is, we associate another number with each function i.e. its probability. The following formula can be used to get rough probabilities for each function. These can however be modified to get better results.
where |det. Ai| is the absolute value of determinant of the matrix Ai and N is the number of functions used which is given by: |det. Ai| = |a.d - b.c|
If, for some i, we get Pi=0 the we assign Pi a small positive value like 0.001.
While finally using the probabilities for rendering it should be noted that ∑ Pi=1
For more information read my answer on StackOverflow
Now, we can use these probabilities to determine how often a function is used to plot the points.
The following four Affine functions are used for the classic Barnsley fern:
Functions
a
b
c
d
e
f
Probability
f1
0.000
0.000
0.000
0.160
0.000
0.000
0.010
f2
0.850
0.040
-0.04
0.850
0.000
1.600
0.850
f3
0.200
-0.26
0.230
0.220
0.000
1.600
0.070
f4
-0.15
0.280
0.260
0.240
0.000
0.440
0.070
The Pseudo Code
AffineFunctions f1,f2,f3,f4
Probabilities p1,p2,p3,p4
N = number of iterations
Point p = a random point with x and y є [0,1]
W,H = Width, Height of Image
for i from 0 to N:
 P = Probability
 if P < p1:
  new_p = f1.transform(p)
 else if P < p1+p2:
  new_p = f2.transform(p)
 else if P < p1+p2+p3:
  new_p = f3.transform(p)
 else:
  new_p = f4.transform(p)
 p = new_p
 Translate Point p to image co-ordinates and render
Java Implementation
Let's begin by implementing a point on 2D plane in Java.
package math.transform;
/**
 * Point is a class which implements a point in 2D plane in Java.
 *
 * @author  Abdul Fatir
 * @version 1.0
 */
public class Point {
 // The X co-ordinate of the Point.
 private double x;
 // The Y co-ordinate of the Point.
 private double y;
 // Constructs a new Point with X = 0.0 and Y = 0.0
 public Point() {
  x = 0.0;
  y = 0.0;
 }
 /**
 * Constructs a new Point object.
 * @param x The X co-ordinate
 * @param y The Y co-ordinate
 */
 public Point(double x, double y) {
  this.x = x;
  this.y = y;
 }
 // @return the X co-ordinate of the Point
 public double getX() {
  return this.x;
 }
 // @return the Y co-ordinate of the Point
 public double getY() {
  return this.y;
 }
 /**
 * Sets the X co-ordinate to the given argument.
 * @param x The X co-ordinate
 */
 public void setX(double x) {
  this.x = x;
 }
 /**
 * Sets the Y co-ordinate to the given argument.
 * @param y The Y co-ordinate
 */
 public void setY(double y) {
  this.y = y;
 }
 /**
 * Translates the point with the passed values.
 * @param dx The translatation in X.
 * @param dy The translatation in Y.
 */
 public void translate(double dx, double dy) {
  x += dx;
  y += dy;
 }
}
Next we implement a 2x2 matrix in Java.
package math.transform;
/**
 * Matrix2D is a class which implements a 2x2 matrix in Java.
 *
 * @author      Abdul Fatir
 * @version   1.0
 *
 */
public class Matrix2D {
  /**
  * The 2D array which represents the 2x2 matrix.
  */
  private double[][] matrix=new double[2][2];
  /**
  * Constructs a new Matrix2D with all elements 0.
  */
  public Matrix2D() {
    matrix[0][0] = 0.0;
    matrix[0][1] = 0.0;
    matrix[1][0] = 0.0;
    matrix[1][1] = 0.0;
  }
  /**
  * Constructs a new Matrix2D with the passed elements.
  * @param a The [0,0] element of the matrix
  * @param b The [0,1] element of the matrix
  * @param c The [1,0] element of the matrix
  * @param d The [1,1] element of the matrix
  */
  public Matrix2D(double a, double b, double c, double d) {
    matrix[0][0] = a;
    matrix[0][1] = b;
    matrix[1][0] = c;
    matrix[1][1] = d;
  }
  /**
  * Constructs a new Matrix2D using the passed array.
  * @param matrix The 2D array representing the matrix
  */
  public Matrix2D(double[][] matrix) {
    this.matrix = matrix;
  }
  /**
  * Computes the determinant of the current matrix.
  * @return The determinant of the current matrix
  */
  public double determinant() {
    return ((matrix[0][0]*matrix[1][1])-(matrix[0][1]*matrix[1][0]));
  }
}
Now, let us implement the Affine Transformation in Java.
package math.transform;
import math.transform.Point;
/**
 * AffineTransformation is a class which implements affine transformation in Java.
 *
 * @author      Abdul Fatir
 * @version   1.0
 *
 */
public class AffineTransformation {
  /**
  * The transformation matrix i.e. a,b,c,d
  */
  private double[][] transformation=new double[2][2];
  /**
  * The translation matrix i.e. e,f
  */
  private double[][] translation=new double[2][1];
  /**
  * Constructs an AffineTransformation with all elements 0.
  */
  public AffineTransformation() {
    transformation[0][0] = 0.0;
    transformation[0][1] = 0.0;
    transformation[1][0] = 0.0;
    transformation[1][1] = 0.0;
    translation[0][0] = 0.0;
    translation[1][0] = 0.0;
  }
  /**
  * Constructs an AffineTransformation with given transformation matrix and translation matrix 0.
  * @param transformation the transformation matrix i.e. a,b,c,d
  */
  public AffineTransformation(double[][] transformation) {
    this.transformation = transformation;
    translation[0][0] = 0.0;
    translation[1][0] = 0.0;
  }
  /**
  * Constructs an AffineTransformation with given transformation matrix and translation matrix.
  * @param transformation the transformation matrix i.e. a,b,c,d
  * @param translation the translation matrix i.e. e,f
  */
  public AffineTransformation(double[][] transformation, double[][] translation) {
    this.transformation = transformation;
    this.translation = translation;
  }
  /**
  * Constructs an AffineTransformation with given a,b,c,d,e,f.
  * @param a the [0,0] element of the transformation matrix
  * @param b the [0,1] element of the transformation matrix
  * @param c the [1,0] element of the transformation matrix
  * @param d the [1,1] element of the transformation matrix
  * @param e the [0,0] element of the translation matrix
  * @param f the [1,0] element of the translation matrix
  */
  public AffineTransformation(double a,double b,double c,double d,double e,double f) {
    transformation[0][0] = a;
    transformation[0][1] = b;
    transformation[1][0] = c;
    transformation[1][1] = d;
    translation[0][0] = e;
    translation[1][0] = f;
  }
  /**
  * Transforms the passed point with the current AffineTransformation
  * @return The transformed point
  */
  public Point transform(Point point) {
    double x = point.getX();
    double y = point.getY();
    double u = 0.0;
    double v = 0.0;
    u = transformation[0][0]*x + transformation[0][1]*y;
    v = transformation[1][0]*x + transformation[1][1]*y;
    u = u + translation[0][0];
    v = v + translation[1][0];
    return new Point(u,v);
  }
  /**
  * @return a Matrix2D object of the transformation matrix.
  */
  public Matrix2D getMatrix2D() {
    return new Matrix2D(transformation[0][0],transformation[0][1],transformation[1][0],transformation[1][1]);
  }
  /**
  * @param transformations The AffineTransformations used.
  * @return An array containing the probabilities to be used for each affine transformation
  */
  public static double[] getProbabilities(AffineTransformation... transformations) {
    double sum_of_determinants = 0;
    double probabilities[] = new double[transformations.length];
    for(AffineTransformation affine : transformations) {
      sum_of_determinants+= Math.abs(affine.getMatrix2D().determinant());
    }
    int i = 0;
    for(AffineTransformation affine : transformations) {
      probabilities[i] = Math.abs(affine.getMatrix2D().determinant())/sum_of_determinants;
      i++;
    }
    return probabilities;
  }
}
Now that we have framed the skeleton of the Iterated function systems, we are ready to use them and create some beautiful ferns.
import math.transform.AffineTransformation;
import math.transform.Point;
import java.io.IOException;
import java.io.File;
import javax.imageio.ImageIO;
import java.awt.image.BufferedImage;
import java.awt.Color;
import java.awt.Graphics;
public class BarnsleyFern {
public static void main(String[] args) throws IOException {
// Defining the four affine transformations for the classic BarnsleyFern
AffineTransformation f1 = new AffineTransformation(0,0,0,0.16,0,0);
AffineTransformation f2 = new AffineTransformation(0.85,0.04,-0.04,0.85,0,1.6);
AffineTransformation f3 = new AffineTransformation(0.2,-0.26,0.23,0.22,0,1.6);
AffineTransformation f4 = new AffineTransformation(-0.15,0.28,0.26,0.24,0,0.44);
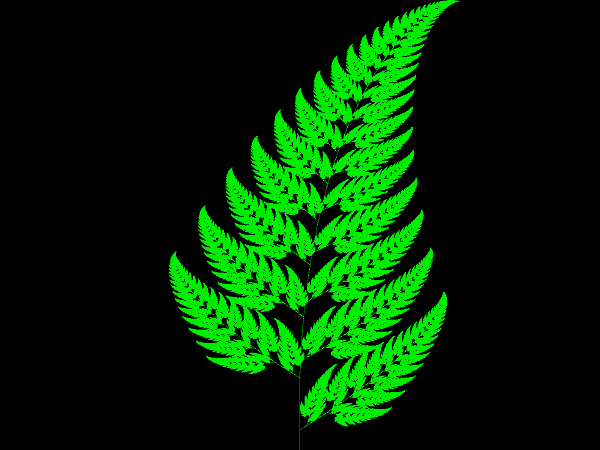
// Defining the color in which the fern will be drawn
Color color = Color.GREEN;
// Defining the Width and Height of the Image
int W=1600;
int H=1200;
// Creating a new blank RGB Image
BufferedImage image = new BufferedImage(W, H,BufferedImage.TYPE_3BYTE_BGR);
// Filling the whole image with black color
Graphics g=image.getGraphics();
g.setColor(Color.BLACK);
g.fillRect(0,0,W,H);
// Choosing the first point randomly using Math.random() which returns a value [0,1]
Point point = new Point(Math.random(),Math.random());
// Defining N which will govern our number of iterations
int N=W*H;
// Defining an array of length N which represents each pixel in the image
int pixels[] = new int[N];
// Iterating N*25 times
for(int i=0;i< N*25;i++) {
Point newpoint = new Point();
// Using a random number between [0,1] as the probability
double probability = Math.random();
// Transforming the point based on the probability
if(probability < 0.01) {
newpoint = f1.transform(point);
} else if(probability < 0.01 + 0.85) {
newpoint = f2.transform(point);
} else if(probability < 0.01 + 0.85 + 0.07) {
newpoint = f3.transform(point);
} else {
newpoint = f4.transform(point);
}
point = newpoint;
// Translating the point to the co-ordinates of the Image
int X = (int)(point.getX()*W/10) + W/2-1;
int Y = (H-1) - (int)(point.getY()*H/10);
// Setting the value of that specific pixel co-ordinate to the RGB value of our color
pixels[W*Y+X] = color.getRGB();
}
// Writing the RGB pixels array to the Image
image.setRGB(0,0,W,H,pixels,0,W);
//Saving the Image
ImageIO.write(image,"PNG", new File("barnsleyfern.png"));
}
}
Explaining the Code
Almost all of the code is pretty self explanatory give the comments however I would like to touch upon the following part which does the task of translating the point to image co-ordinates:
int X = (int)(point.getX()*W/10) + W/2-1;
int Y = (H-1) - (int)(point.getY()*H/10);
The output given by the affine transformations is within the range −2.1820 < x < 2.6558 and 0 ≤ y < 9.9983. So, in order to translate these values into pixel co-ordinates we require some computations. For example, the absolute range of x [−2.1820, 2.6558] is approximately 5 and that of y [0, 9.9983] is approximately 10.
We calculate the Y co-ordinate by multiplying point.getY() with Height of the image and then dividing it by 10. This will lead to: Y = point.getY()*H/10
but this leads to the creation of an inverted image hence we subtract it from (H-1) to make the image upright. The -1 is used because image co-ordinates range from [0,H) leading to the final expression: Y = (H-1) - (point.getY()*H/10)
The case of X is a bit more complex than this. First we multiply point.getX() with the Width of the image and divide it by 5 (the absolute range of x) but since the co-ordinates will come negative by the approach we need to add W/2 to translate the lowest pixel X co-ordinate to 0 thereby giving the formula: X = (point.getX()*W/5) + W/2-1
The -1 is again used for the above mentioned reason. This formula however leads to a bloated image so we need to shrink it in X and hence we divide the whole equation by 2, leading to: X = (point.getX()*W/10) + W/4-1
This creates a perfect image but shifts it to the left half so we add another W/4 to get the final formula: X = (point.getX()*W/10) + W/2-1
The above code results in the following output:
We can then use different colors for each of the four functions to see which function colors what part by editing the above code as follows:
if(probability < 0.01) {
  newpoint = f1.transform(point);
  color = new Color(0xFF3800);
} else if(probability < 0.01 + 0.85) {
  newpoint = f2.transform(point);
  color = Color.GREEN;
} else if(probability < 0.01 + 0.85 + 0.07) {
  newpoint = f3.transform(point);
  color = new Color(0xFDEE00);
} else {
  newpoint = f4.transform(point);
  color = new Color(0x007FFF);
}
point = newpoint;
This produces the following output:
We can play with colors and translation of point in other ways to render more aesthetic images.
An example in JavaScript
Mutations of the Barnsley Fern
The following are the mutations of the fern created by playing around with the values of the affine functions.
Leptosporangiate fern
Functions
a
b
c
d
e
f
Probability
f1
0.000
0.000
0.000
0.250
0.000
-0.14
0.020
f2
0.850
0.020
-0.02
0.830
0.000
1.000
0.840
f3
0.090
-0.28
0.300
0.110
0.000
0.600
0.070
f4
-0.09
0.280
0.300
0.090
0.000
0.700
0.070
Fishbone Fern
Functions
a
b
c
d
e
f
Probability
f1
0.000
0.000
0.000
0.250
0.000
-0.40
0.020
f2
0.950
0.002
-.002
0.930
-.002
0.500
0.840
f3
0.035
-0.11
0.270
0.010
-0.05
0.005
0.070
f4
-0.04
0.110
0.270
0.010
0.047
0.060
0.070
Thelypteridaceae fern
Functions
a
b
c
d
e
f
Probability
f1
0.000
0.000
0.000
0.250
0.000
-0.40
0.010
f2
0.950
0.005
-.005
0.930
-.002
0.500
0.930
f3
0.035
-0.2
0.160
0.040
-0.09
0.020
0.030
f4
-0.04
0.200
0.160
0.040
0.083
0.120
0.030
Many more such mutations can be created by playing with the numbers.
In the previous article, I gave an introduction to cryptology and a demonstration of how ciphers work. I started with the very basic cipher, the Caesar cipher. In this article we will see how Caesar cipher can be improved and are introduced to other ciphers.
Poly-alphabetic Cipher
What makes Caesar cipher vulnerable? The fact that it can be cracked in only 25 attempts at the maximum or even less if you're smart. The polyalphabetic cipher comes to our rescue. In polyalphabetic cipher the key is a word rather than a number (shift amount, as in Caesar cipher). The key should be less than or equal to the plain-text we input.
Let us take a sample input: thisisamessage
And a sample key: secret
Each letter of the plain-text is first mapped to each letter from the key as follows:
t  h  i  s  i  s  a  m  e  s  s  a  g  e
20 8  9  19 9 19  1 13  5 19 19  1  7  5
s  e  c  r  e  t  s  e  c  r  e  t  s  e
19 5  3 18  5 20  19 5  3 18  5 20 19  5
As you can see if the length of text is not the exact multiple of the length of the key we simply use the letters of the key until the input text is completed, like for the last letters (ge) of the message as many letters of key (se) are used. The number under each letter represents its place of occurrence in the English alphabet. Now each letter is shifted by the amount of the letter of key under it. For example, t is shifted by 19 and becomes m, h by 5 and becomes m, i by 3 and becomes l and so on.
After the shift the table becomes:
t  h  i  s  i  s  a  m  e  s  s  a  g  e
20 8  9  19 9 19  1 13  5 19 19  1  7  5
s  e  c  r  e  t  s  e  c  r  e  t  s  e
19 5  3 18  5 20  19 5  3 18  5 20 19  5
m  m  l  k  n  m  t  r  h  k  x  u  z  j
And hence, the cipher text is computed to be: mmlknmtrhkxuzj
As you may have judged by now, this cipher is relatively tougher to crack than the Caesar cipher.
Here is an example JavaScript implementation, try it out:
Check the page source for the JavaScript code or check this open-source project I made for the poly-alphabetic cipher in Java.
The poly-alphabetic cipher, though better than Caesar cipher, is very vulnerable because in the end it is a substitution cipher and if the data is more then patterns can be guessed and the encryption can be cracked.
One Time Pad
The One time pad is also a substitution cipher but it is better than Caesar and the poly-alphabetic cipher in a way that every letter in the input message is shifted by a random amount and hence a key is generated which is equal to the input data. What makes this cipher secure is the randomness.
A n letter word in this case can have 26n possible outcomes which for just a six letter word is 308915776 possibilities. This number increases exponentially as the input data size increases. The downside of this cipher however is that it generates a key which is equal to the input data which doubles the amount of data to be handled and transmitted.
Here is an example for you to try:
# OneTimePad.py
# Abdul Fatir
import sys
import random
def shiftAlpha(alpha,shift):
  if ord(alpha)+shift > 122:
    return chr(ord(alpha)+shift-122+96)
  else:
    return chr(ord(alpha)+shift)
  plaintext = sys.argv[1]
  cipher = ''
  for i in range(len(plaintext)):
    cipher += shiftAlpha(plaintext[i],random.randint(1,26))
  print cipher
The ciphers about which we read till now were all substitution ciphers. The next cipher which we're going to read about is a type of symmetric key encryption.
Block Cipher
This is a type of symmetric key encryption which is in use even today. This encryption is based on the XOR logic gate. The beauty of the XOR logic gate is that this operation is symmetric i.e. (X [xor] Y) [xor] Y = X
Now if we XOR the plain-text with a key we get the cipher-text and XORing the cipher-text again with the key returns the plain-text.
Every ASCII alphabet (letters, alphabets, special chars etc.) has a value ranging from 0 to 255 hence every ASCII character can be represented by an 8 bit (1 byte) binary number. For example, A in ASCII is 65 which will be equal to 01000001 in a 8 bit binary notation.
First the input text is converted into binary. Let us take hello as the input text and key as the key.
Next, it is checked if the length of the plain-text is an exact multiple of the length of the key. If yes, we proceed to the next step. If no, a number of pad bytes are added to make the plain-text an exact multiple on the key.
In our example the length of the key is 3 and the plain-text is 5. Now, 5 is not a multiple of 3 and the next multiple is 6. The difference between 6 and 5 is 1 so we need to add one pad character to make the input an exact multiple of 3. The pad character is a null byte (00000000) i.e. a binary number with all bits 0.
The C is cipher-text which in integers is equal to: 3 0 21 7 10 121
These ASCII codes of the cipher-text if converted to the character come out to be very weird characters. Just for the sake of the example 3 0 21 7 10 121 in ASCII characters is:
♥ \0 § \a \n y
# BlockCipher.py
# Abdul Fatir
import sys
plaintext = sys.argv[1]
while 1:
  key = raw_input("Please enter the key:")
  if len(key) <= len(plaintext):
    break
  print "The key-length should be less than or equal to the plaintext"

keyindex = 0
ciphertext = ''
# Add padding
extra_chars = len(plaintext)%len(key)
if extra_chars > 0:
  for i in range(len(key)-extra_chars):
    plaintext += chr(0)
for index in range(len(plaintext)):
  if keyindex==len(key):
    keyindex=0
  cipherletter = chr(ord(plaintext[index])^ord(key[keyindex]))
  ciphertext += cipherletter
  keyindex+=1
  for i in range(len(ciphertext)):
    print (ord(ciphertext[i])),
Now that we have learned how to make Julia set fractals we're all set to discover the color mapping algorithms to create different types of images other then the bright red ones.
Note: In all subsequent examples I'll illustrate the drawing of image in a function called drawFractal() because writing the entire code for each type of manipulation will make the post unnecessarily lengthy.
Hue Shift
Continuing from where we last left, the simplest way to generate images with different colors in different areas will be to shift the Hue by some constant value for each pixel. You can also tweak around with the saturation and brightness values to achieve desired outcome.
publicvoid drawFractal()throws IOException
{
doubleWIDTH=1600;
doubleHEIGHT=1200;
floatSaturation=0.6f;
floatHUE_SHIFT=0f;
BufferedImage img =newBufferedImage((int)WIDTH, (int)HEIGHT,BufferedImage.TYPE_3BYTE_BGR);
BufferedReader reader =newBufferedReader(newInputStreamReader(System.in));
out.print("Re(c): ");
double cReal =Double.parseDouble(reader.readLine());
out.print("Im(c): ");
double cImag =Double.parseDouble(reader.readLine());
out.print("Hue Shift (0-1): ");
HUE_SHIFT=Float.parseFloat(reader.readLine());
ComplexNumber constant =newComplexNumber(cReal,cImag);
int max_iter =256;
for(intX=0; X<WIDTH;X++)
{
for(intY=0; Y<HEIGHT;Y++)
{
ComplexNumber oldz =newComplexNumber();
ComplexNumber newz =newComplexNumber(2.0*(X-WIDTH/2)/(WIDTH/2), 1.33*(Y-HEIGHT/2)/(HEIGHT/2) );
int i;
for(i=0;i<max_iter; i++)
{
oldz = newz;
newz = newz.square();
newz.add(constant);
if(newz.mod() >2)
break;
}
floatBrightness= i < max_iter ?0.8f:0;
// Mapping the number of iterations to a Hue between 0.0 to 1.0floatHue= (i%256)/255.0;
// If the shifted Hue > 1 then we reduce it by 1 because Hue is circularif(Hue+HUE_SHIFT>1)
{Hue=Hue-1;Hue+=HUE_SHIFT;}
elseHue+=HUE_SHIFT;
// Creating color using shifted HueColor color =Color.getHSBColor(Hue, Saturation, Brightness);
img.setRGB(X,Y,color.getRGB());
}
}
ImageIO.write(img,"PNG", newFile("hue_shift-julia.png"));
}
The following image was created using the above code with, c = -0.8 + 0.156i and a HUE_SHIFT = 0.15
HUE_SHIFT = 0.15
Mathematical function to Color Another way of choosing the color for a pixel is to feel the number of iterations in a mathematical function which has a range of [0,1] and hence use the output value as the Hue for creating an HSB color with constant saturation and brightness. Here I illustrate using a modified sine function to get the result. The algorithm is as follows:
i) Take the modulus of the number of iterations taken for the pixel to escape with 256 to bring it in range 0-255. ii) Feed the value into the function f(x) = |sin (x)| ii) Use the output of the function as the Hue.
Well, this doesn't produce very aesthetic result but the function and color mapping technique can be further tweaked to get one. Here is the output with c = -0.8 + 0.156i:
modified sine function
Histogram Coloring
The earlier methods used the number of iterations taken to escape directly to map the color. In histogram coloring we instead first create a histogram of number of pixels that took a specific number of iterations to escape the radius of 2. Then the colors are mapped in ratio of number of pixels that took the specific iteration number. The algorithm below will clarify the usage:
i) Create an array of size = maximum iterations. ii) Loop through every pixel of image and for each pixel that took i number of iterations increment the ith element of the array by 1. iii) This creates a histogram which will now be used to color the image. iv) Loop through each pixel once again. v) For every pixel taking i iterations loop from 0 to i and sum up the fractions of histogram_value of each array element leading to i divided by the total number of pixels. vi) Use this value as Hue.
publicvoid drawFractal()throws IOException
{
doubleWIDTH=3200;
doubleHEIGHT=2400;
floatSaturation=0.9f;
BufferedImage img =newBufferedImage((int)WIDTH, (int)HEIGHT,BufferedImage.TYPE_3BYTE_BGR);
BufferedReader reader =newBufferedReader(newInputStreamReader(System.in));
out.print("Re(c): ");
double cReal =Double.parseDouble(reader.readLine());
out.print("Im(c): ");
double cImag =Double.parseDouble(reader.readLine());
ComplexNumber constant =newComplexNumber(cReal,cImag);
int max_iter =256;
// Create an aaray for histogramint[] histogram=newint[256];
for(intX=0; X<WIDTH;X++)
{
for(intY=0; Y<HEIGHT;Y++)
{
ComplexNumber oldz =newComplexNumber();
ComplexNumber newz =newComplexNumber(2.0*(X-WIDTH/2)/(WIDTH/2), 1.33*(Y-HEIGHT/2)/(HEIGHT/2) );
int i;
for(i=0;i<max_iter; i++)
{
oldz = newz;
newz = newz.square();
newz.add(constant);
if(newz.mod() >2)
break;
}
if(i == max_iter)
--i;
// Increment the ith element by 1 for every pixel that took i number of iterations
histogram[i]++;
}
}
// Loop through pixels a second timefor(intX=0; X<WIDTH;X++)
{
for(intY=0; Y<HEIGHT;Y++)
{
ComplexNumber oldz =newComplexNumber();
ComplexNumber newz =newComplexNumber(2.0*(X-WIDTH/2)/(WIDTH/2), 1.33*(Y-HEIGHT/2)/(HEIGHT/2) );
int i;
for(i=0;i<max_iter; i++)
{
oldz = newz;
newz = newz.square();
newz.add(constant);
if(newz.mod() >2)
break;
}
if(i == max_iter)
--i;
floatBrightness= i < max_iter ?1f:0;
doubleHue=0;
// Loop from 0 to number of iterations this pixel took and sum up all the fractions of histogram_value of each array element leading to i divided by the total number of pixels.for (int j =0; j <= i; j +=1)
Hue+= histogram[j]/(WIDTH*HEIGHT);
Color color =Color.getHSBColor((float)(Hue), Saturation, Brightness);
img.setRGB(X,Y,color.getRGB());
}
}
ImageIO.write(img,"PNG", newFile("histogram-julia.png"));
}
The following image was created using histogram coloring with c = 0.233 + 0.53780i:
histogram coloring
Gray-scale Color Palette In this method we first create a 256 gray-scale color palette and then map the number of iterations taken by each pixel to the palette to get the corresponding color. The algorithm of creating the color palette is as follows:
i) Create an array of 256 elements. Loop through each pixel using a loop variable, say n. ii) The color at each index is given by using the formula: colors[n] = n + (512-512e(-n/50)/3)
publicvoid drawFractal()throws IOException
{
doubleWIDTH=4000;
doubleHEIGHT=3000;
floatSaturation=1f;
BufferedImage img =newBufferedImage((int)WIDTH, (int)HEIGHT,BufferedImage.TYPE_3BYTE_BGR);
BufferedReader reader =newBufferedReader(newInputStreamReader(System.in));
out.print("Re(c): ");
double cReal =Double.parseDouble(reader.readLine());
out.print("Im(c): ");
double cImag =Double.parseDouble(reader.readLine());
ComplexNumber constant =newComplexNumber(cReal,cImag);
int palette[] =newint[256];
// Making the color palettefor(int n=0;n<256;n++)
{
palette[n]=(int)(n+512-512*Math.exp(-n/50.0)/3.0);
palette[n]=palette[n]<<16| palette[n]<<8| palette[n];
}
// The extreme color is black for representation of prisoner set
palette[255]=0;
int max_iter =256;
for(intX=0; X<WIDTH;X++)
{
for(intY=0; Y<HEIGHT;Y++)
{
ComplexNumber oldz =newComplexNumber();
ComplexNumber newz =newComplexNumber(2.0*(X-WIDTH/2)/(WIDTH/2), 1.33*(Y-HEIGHT/2)/(HEIGHT/2) );
int i;
for(i=0;i<max_iter; i++)
{
oldz = newz;
newz = newz.square();
newz.add(constant);
if(newz.mod() >2)
break;
}
floatBrightness= i < max_iter ?1f:0;
// Setting the pixel to color from the palette
img.setRGB(X,Y,palette[i%256]);
}
}
ImageIO.write(img,"PNG", newFile("grayscale_palette_julia.png"));
}
The following image was created using the same palette with c = -0.4 + 0.6i:
grayscale palette
Custom Color Mapping
This is one of the most beautiful techniques of mapping a color. In this technique we use two or more colors to create a gradient like color map which is than mapped to the ratio of number of iterations a particular pixel took to the maximum number of iterations.
For generating the color map we are going to use a function makeColorMap(int STEPS, Color ... in_colors) where steps is the number of colors required from the first color to the last color in colors or the size of out_colors array. (Courtesy: Marco13)
/**
* Generates a color map based on the input colors
* @param in_colors the input colors
* @return an array containing the colors linearly changing from the first input color to the last
*/publicstaticint[] makeColorMap(int steps, Color ... in_colors)
{
int colorMap[] =newint[steps];
if (in_colors.length ==1)
{
Arrays.fill(colorMap, in_colors[0].getRGB());
return colorMap;
}
double colorDelta =1.0/ (in_colors.length -1);
for (int i=0; i<steps; i++)
{
double globalRel = (double)i / (steps -1);
int index0 = (int)(globalRel / colorDelta);
int index1 =Math.min(in_colors.length-1, index0 +1);
double localRel = (globalRel - index0 * colorDelta) / colorDelta;
Color c0 = in_colors[index0];
int r0 = c0.getRed();
int g0 = c0.getGreen();
int b0 = c0.getBlue();
int a0 = c0.getAlpha();
Color c1 = in_colors[index1];
int r1 = c1.getRed();
int g1 = c1.getGreen();
int b1 = c1.getBlue();
int a1 = c1.getAlpha();
int dr = r1-r0;
int dg = g1-g0;
int db = b1-b0;
int da = a1-a0;
int r = (int)(r0 + localRel * dr);
int g = (int)(g0 + localRel * dg);
int b = (int)(b0 + localRel * db);
int a = (int)(a0 + localRel * da);
int rgb =
(a <<24) |
(r <<16) |
(g <<8) |
(b <<0);
colorMap[i] = rgb;
}
return colorMap;
}
publicvoid drawFractal()throws IOException
{
doubleWIDTH=4000;
doubleHEIGHT=3000;
floatSaturation=1f;
BufferedImage img =newBufferedImage((int)WIDTH, (int)HEIGHT,BufferedImage.TYPE_3BYTE_BGR);
BufferedReader reader =newBufferedReader(newInputStreamReader(System.in));
out.print("Re(c): ");
double cReal =Double.parseDouble(reader.readLine());
out.print("Im(c): ");
double cImag =Double.parseDouble(reader.readLine());
ComplexNumber constant =newComplexNumber(cReal,cImag);
// Making a color map based based on the colors #000004, #ffffff, #ff033f and #000000int out_colors[] = makeColorMap(1024, newColor(0x000004), Color.WHITE,newColor(0xFF033E),Color.BLACK);
int max_iter =256;
for(intX=0; X<WIDTH;X++)
{
for(intY=0; Y<HEIGHT;Y++)
{
ComplexNumber oldz =newComplexNumber();
ComplexNumber newz =newComplexNumber(2.0*(X-WIDTH/2)/(WIDTH/2), 1.33*(Y-HEIGHT/2)/(HEIGHT/2) );
int i;
for(i=0;i<max_iter; i++)
{
oldz = newz;
newz = newz.square();
newz.add(constant);
if(newz.mod() >2)
break;
}
floatBrightness= i < max_iter ?1f:0;
// Taking the ratio of number of iterations to max_iterdouble value = (double)i / max_iter;
double d =Math.max(0.0, Math.min(1.0, value));
// Multiplying the ratio with the length of the array to get an indexint index = (int)(d * (out_colors.length -1));
// Using the color at the index to write the pixel
img.setRGB(X,Y,out_colors[index]);
}
}
ImageIO.write(img,"PNG", newFile("custom_color_julia.png"));
}
Here is the output from the above snippet:
i) With colors #000004, #ffffff, #ff033f and #000000 and c = -0.8 + 0.156i
ii) With colors #000004, #ffffff,#bfff00, and #000000 and c = -0.4 + 0.6i
Another example,
Cubic and Higher Julia Functions
Julia set is not just limited to two degree complex equations. Here is an example of a 3 degree complex fractal, f(z) = z3 + C.
publicvoid drawFractal()throws IOException
{
doubleWIDTH=2000;
doubleHEIGHT=1500;
floatHUE_SHIFT=0f;
floatSaturation=1f;
BufferedImage img =newBufferedImage((int)WIDTH, (int)HEIGHT,BufferedImage.TYPE_3BYTE_BGR);
BufferedReader reader =newBufferedReader(newInputStreamReader(System.in));
out.print("Re(c): ");
double cReal =Double.parseDouble(reader.readLine());
out.print("Im(c): ");
double cImag =Double.parseDouble(reader.readLine());
ComplexNumber constant =newComplexNumber(cReal,cImag);
// Making a color map based based on the colors #000060, #FF007F, Yellow and #7B3F00int out_colors[] = makeColorMap(1024,newColor(0x000060),newColor(0xFF007F),Color.YELLOW,newColor(0x7B3F00));
int max_iter =64;
for(intX=0; X<WIDTH;X++)
{
for(intY=0; Y<HEIGHT;Y++)
{
ComplexNumber oldz =newComplexNumber();
ComplexNumber newz =newComplexNumber(2.0*(X-WIDTH/2)/(WIDTH/2), 1.33*(Y-HEIGHT/2)/(HEIGHT/2) );
int i;
for(i=0;i<max_iter; i++)
{
oldz = newz;
// Multiplying the number with its square gives the cube
newz.multiply(newz.square());
newz.add(constant);
if(newz.mod() >2)
break;
}
floatBrightness= i < max_iter ?1f:0;
double value = (double)i / max_iter;
double d =Math.max(0.0, Math.min(1.0, value));
int index = (int)(d * (out_colors.length -1));
img.setRGB(X,Y,out_colors[index]);
}
}
ImageIO.write(img,"PNG", newFile("julia_cubic.png"));
}
Here are some output images:
i) Z = Z3 + 0.400 + 0i
ii) Z = Z4 + 0.484 + 0i
iii) Z = Z5 + 0.544 + 0i
Zooming your Fractals
Fractals are repetitive structures so if we zoom out fractals we see that they repeat themselves on very small scales too. On zooming the details are more prominent and beautiful. Zooming the fractal is pretty each. Just define a ZOOM factor and while setting the z0 for each pixel change the formula as follows:
Re(Z0) = 2 * (X-WIDTH/2)/(WIDTH*ZOOM/2) Im(Z0) = 1.33 * (Y-HEIGHT/2)/(HEIGHT*ZOOM/2), where (x,y) is the co-ordinate of the pixel. Besides zooming the fractal we can also shift each pixel by a factol (shiftX, shiftY). Here is how:
Re(Z0) = 2 * (X-WIDTH/2)/(WIDTH*ZOOM/2) + shiftX Im(Z0) = 1.33 * (Y-HEIGHT/2)/(HEIGHT*ZOOM/2) + shiftY, where (x,y) is the co-ordinate of the pixel.