Showing posts with label Windows. Show all posts

Create WiFi Hotspot using Command Prompt

The following are the steps to create a WiFi hotspot using Command Line:

a) Open an Administrator Command Prompt.
b) Type netsh and press enter.
c) Type wlan and press enter.
d) Create a hosted network by typing the following command:

set hostednetwork mode=allow ssid=NetworkName key=password

e) Type the following command to start the created hotspot:

start hostednetwork

f) Anytime when you're done, type the following to stop it:

stop hostednetwork

Moving through folders in Command Prompt

CD command, also known as chdir (change directory) is the most commonly used command. It is used to change our current working directory. While working in command prompt we need to move through directories (folders).

Syntax :
cd <folder_name>

Important Parameters :
/d - To change the drive while changing the folder.

Example Usage :
Suppose We have a folder named 'abc' in E:\ and another folder 'xyz' in 'abc' and we are currently in E:\ in our command prompt.

a) cd abc - will take you inside the folder named 'abc'.
b) cd .. - will take you one folder backwards i.e. back to E:\
c) cd abc\xyz will take you directly from E:\ to E:\abc\xyz.
d) cd\ - will take you directly to the E:\ from E:\abc\xyz.
f) cd /d C:\Windows - will change your drive and take you to C:\Windows from E:\


100+ keyboard shortcuts you ought to know

Keyboard shortcuts are an excellent way to do your work faster. In this post, we'll introduce you to some of the most commonly used keyboard shortcuts in Windows.

The General Shortcuts

Some really general shortcuts that you often used.

  • CTRL+C (Copy)
  • CTRL+X (Cut)
  • CTRL+V (Paste)
  • CTRL+Z (Undo)
  • Delete (Delete)
  • Shift+Delete (Delete the selected item permanently without placing the item in the Recycle Bin)
  • CTRL while dragging an item (Copy the selected item)
  • CTRL+Shift while dragging an item (Create a shortcut to the selected item)
  • F2 key (Rename the selected item)
  • CTRL+RIGHT ARROW (Move the insertion point to the beginning of the next word)
  • CTRL+LEFT ARROW (Move the insertion point to the beginning of the previous word)
  • CTRL+DOWN ARROW (Move the insertion point to the beginning of the next paragraph)
  • CTRL+UP ARROW (Move the insertion point to the beginning of the previous paragraph)
  • CTRL+Shift with any of the arrow keys (Highlight a block of text)
  • Shift with any of the arrow keys (Select more than one item in a window or on the desktop, or select text in a document)
  • CTRL+A (Select all)
  • F3 key (Search for a file or a folder)
  • Alt+Enter (View the properties for the selected item)
  • Alt+F4 (Close the active item, or quit the active program)
  • Alt+Enter (Display the properties of the selected object)
  • Alt+Spacebar (Open the shortcut menu for the active window)
  • CTRL+F4 (Close the active document in programs that enable you to have multiple documents open simultaneously)
  • Alt+Tab (Switch between the open items)
  • Alt+ESC (Cycle through items in the order that they had been opened)
  • F6 key (Cycle through the screen elements in a window or on the desktop)
  • F4 key (Display the Address bar list in My Computer or Windows Explorer)
  • Shift+F10 (Display the shortcut menu for the selected item)
  • Alt+Spacebar (Display the System menu for the active window)
  • CTRL+ESC (Display the Start menu)
  • Alt+Underlined letter in a menu name (Display the corresponding menu)
  • Underlined letter in a command name on an open menu (Perform the corresponding command)
  • F10 key (Activate the menu bar in the active program)
  • RIGHT ARROW (Open the next menu to the right, or open a submenu)
  • LEFT ARROW (Open the next menu to the left, or close a submenu)
  • F5 key (Update the active window)
  • Backspace (View the folder one level up in My Computer or Windows Explorer)
  • ESC (Cancel the current task)
  • Shift when you insert a CD-ROM into the CD-ROM drive (Prevent the CD-ROM from automatically playing)

Dialog Box Keyboard Shortcuts

  • CTRL+Tab (Move forward through the tabs)
  • CTRL+Shift+Tab (Move backward through the tabs)
  • Tab (Move forward through the options)
  • Shift+Tab (Move backward through the options)
  • Alt+Underlined letter (Perform the corresponding command or select the corresponding option)
  • Enter (Perform the command for the active option or button)
  • Spacebar (Select or clear the check box if the active option is a check box)
  • Arrow keys (Select a button if the active option is a group of option buttons)
  • F1 key (Display Help)
  • F4 key (Display the items in the active list)
  • Backspace (Open a folder one level up if a folder is selected in the Save As or Open dialog box)

Microsoft Natural Keyboard Shortcuts

  • Win (Display or hide the Start menu)
  • Win+BREAK (Display the System Properties dialog box)
  • Win+D (Display the desktop)
  • Win+M (Minimize all of the windows)
  • Win+Shift+M (Restore the minimized windows)
  • Win+E (Open My Computer)
  • Win+F (Search for a file or a folder)
  • CTRL+Win+F (Search for computers)
  • Win+F1 (Display Windows Help)
  • Win+ L (Lock the keyboard)
  • Win+R (Open the Run dialog box)
  • Win+U (Open Utility Manager)

Accessibility Keyboard Shortcuts

  • Right Shift for eight seconds (Switch FilterKeys either on or off)
  • Left Alt+left Shift+PRINT SCREEN (Switch High Contrast either on or off)
  • Left Alt+left Shift+NUM LOCK (Switch the MouseKeys either on or off)
  • Shift five times (Switch the StickyKeys either on or off)
  • NUM LOCK for five seconds (Switch the ToggleKeys either on or off)
  • Win +U (Open Utility Manager)

Windows Explorer Keyboard Shortcuts

  • END (Display the bottom of the active window)
  • HOME (Display the top of the active window)
  • NUM LOCK+* (Display all of the subfolders that are under the selected folder)
  • NUM LOCK++ (Display the contents of the selected folder)
  • NUM LOCK+- (Collapse the selected folder)
  • LEFT ARROW (Collapse the current selection if it is expanded, or select the parent folder)
  • RIGHT ARROW (Display the current selection if it is collapsed, or select the first subfolder)

Shortcut Keys for Character Map

  • After you double-click a character on the grid of characters, you can move through the grid by using the keyboard shortcuts:
  • RIGHT ARROW (Move to the right or to the beginning of the next line)
  • LEFT ARROW (Move to the left or to the end of the previous line)
  • UP ARROW (Move up one row)
  • DOWN ARROW (Move down one row)
  • PAGE UP (Move up one screen at a time)
  • PAGE DOWN (Move down one screen at a time)
  • HOME (Move to the beginning of the line)
  • END (Move to the end of the line)
  • CTRL+HOME (Move to the first character)
  • CTRL+END (Move to the last character)
  • Spacebar (Switch between Enlarged and Nor mal mode when a character is selected)

Microsoft Management Console (MMC) Main Window Keyboard Shortcuts

  • CTRL+O (Open a saved console)
  • CTRL+N (Open a new console)
  • CTRL+S (Save the open console)
  • CTRL+M (Add or remove a console item)
  • CTRL+W (Close window/tab)
  • F5 key (Update the content of all console windows)
  • Alt+Spacebar (Display the MMC window menu)
  • Alt+F4 (Close the console)
  • Alt+A (Display the Action menu)
  • Alt+V (Display the View menu)
  • Alt+F (Display the File menu)
  • Alt+O (Display the Favorites menu)

MMC Console Window Keyboard Shortcuts

  • CTRL+P (Print the current page or active pane)
  • Alt+- (Display the window menu for the active console window)
  • Shift+F10 (Display the Action shortcut menu for the selected item)
  • F1 key (Open the Help topic, if any, for the selected item)
  • F5 key (Update the content of all console windows)
  • CTRL+F10 (Maximize the active console window)
  • CTRL+F5 (Restore the active console window)
  • Alt+Enter (Display the Properties dialog box, if any, for the selected item)
  • F2 key (Rename the selected item)
  • CTRL+F4 (Close the active console window. When a console has only one console window, this shortcut closes the console)

Remote Desktop Connection Navigation

  • CTRL+Alt+END (Open the m*cro$oft Windows NT Security dialog box)
  • Alt+PAGE UP (Switch between programs from left to right)
  • Alt+PAGE DOWN (Switch between programs from right to left)
  • Alt+INSERT (Cycle through the programs in most recently used order)
  • Alt+HOME (Display the Start menu)
  • CTRL+Alt+BREAK (Switch the client computer between a window and a full screen)
  • Alt+Delete (Display the Windows menu)
  • CTRL+Alt+- (Place a snapshot of the active window in the client on the Terminal server clipboard and provide the same functionality as pressing PRINT SCREEN on a local computer.)
  • CTRL+Alt++ (Place a snapshot of the entire client window area on the Terminal server clipboard and provide the same functionality as pressing Alt+PRINT SCREEN on a local computer.)

Internet Explorer navigation

  • CTRL+B (Open the Organize Favorites dialog box)
  • CTRL+E (Open the Search bar)
  • CTRL+F (Start the Find utility)
  • CTRL+H (Open the History bar)
  • CTRL+I (Open the Favorites bar)
  • CTRL+L (Open the Open dialog box)
  • CTRL+N (Start another instance of the browser with the same Web address)
  • CTRL+O (Open the Open dialog box, the same as CTRL+L)
  • CTRL+P (Open the Print dialog box)
  • CTRL+R (Update the current Web page)
  • CTRL+W (Close the current window)

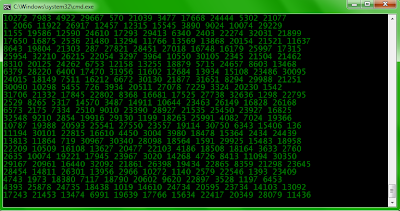
Matrix type running numbers using batch file

Ever wanted to see a running matrix type window with black background and green random numbers.

Here is a very simple code to do this:

  • Open Notepad and type the following code:
  • @echo off
    color 2
    :looplabel
    echo %random% %random% %random% %random% %random% %random% %random% %random% %random% %random% %random%
    goto looplabel
    
  • Save this file as "matrix.bat" (with quotes i.e. a file named matrix with extension .bat)
  • Double click this batch file and see the matrix.
  • Press Ctrl + C or close the Command Prompt window to stop this script.

Setting up Java : Setting the path Environment Variable

The JDK has a number of tools which are used in day to day Java coding. Here is a list of some of such tools :

a) javac - The Java Compiler (which converts our source code into machine executable code)

b) java - The Java Interpreter (which runs our code line by line)

c) javadoc - To make the HTML documentation of our code

d) jar - To create the Java Archive (jar) file for our code

e) javap - To disassemble a class file

These tools are present in C:\Program Files\Java\jdk1.[your version]\bin (or C:\Program Files(x86)\Java\jdk1.[your version]\bin). We need some of these tools (like javac & java) again and again to compile and run our code. For this reason we set the path environment to point to this folder so that we can use all its tools from anywhere in our computer.

There are two methods to do so:

a) Using System Properties (Easy)
b) Using Command Line (Medium)

a) Using System Properties

i) Go to C:\Program Files\Java\jdk1.[your version]\bin and copy this path from the address bar.


ii) Right Click on Computer (or My Computer) present on desktop and click on Properties.

iii) Click on Advanced System Settings in the left hand pane (or Advanced tab in case of Windows XP).


iv) Click on Environment Variables.

v) Under the System variables look for a variable named path.

vi) Click on Edit.

Click to Enlarge


vii) In the variable value text field do not delete the stuff which is already present but just add a ; in the end.

viii) Now paste the path (C:\Program Files\Java\jdk1.[your version]\bin) you earlier copied after the ;


ix) Click on OK. OK again and OK yet again and you're done.

b) Using Command Line

i) Press Window Key + R and type cmd to Open Command Prompt.

ii) Type the following command :

setx path "%path%;C:\Program Files\Java\jdk1.[your version]\bin"


iii) You're done with editing your path variable.

Note: [your version] means your JDK version for example if your JDK version is 1.7.0 update 25 then the full path will be C:\Program Files\Java\jdk1.7.0_25\bin. So replace every instance of [your version] by your actual folder name of JDK.

Setting up Java: Installing the Java Development Kit (JDK)

Before we jump into coding let's learn how to install the Java Development Kit (JDK) because you cannot code without an SDK (Software Development Kit), JDK in the case of Java.

Follow these steps:

Downloading the JDK

a) Google "jdk" and follow the first result (oracle.com). Alternatively directly goto http://www.oracle.com/technetwork/java/javase/downloads/jdk7-downloads-1880260.html

b) Look for Java SE Development Kit and download the Windows x86 version (if you have 32 bit Windows) or the Windows x64 version (if you have 64 bit Windows) by accepting the license agreement.

Installing the JDK

a) Open the downloaded file which may be named something like jdk-7u25-windows-i586.exe

b) Follow the simple instructions of the Windows Installer to install JDK (i.e. simply clicking Next on each Window)

c)  After the installation is completed go to C:\Program Files\Java\ (or C:\Program Files(x86)\Java\) and check if there is a folder name starting something like jdk1.7.0 (jdk1.7.0_25 in my case)


d) If the above mentioned folder exists you've successfully installed JDK.

P.S. : If you don't know about 32 bit and 64 bit architecture then download the x86 version of JDK.

A prank virus that opens a notepad and types automatically

Make the notepad type text automatically. Here are the steps:
  • Type the following code in notepad:
  • WScript.Sleep 2000
    Set WshShell = WScript.CreateObject("WScript.Shell")
    WshShell.Run "notepad"
    WScript.Sleep 100
    WshShell.AppActivate "Notepad"
    WScript.Sleep 500
    WshShell.SendKeys "H"
    WScript.Sleep 500
    WshShell.SendKeys "e" 
    WScript.Sleep 500
    WshShell.SendKeys "l"  
    WScript.Sleep 500
    WshShell.SendKeys "l" 
    WScript.Sleep 500
    WshShell.SendKeys "o " 
    WScript.Sleep 500
    WshShell.SendKeys "A" 
    WScript.Sleep 500
    WshShell.SendKeys "r" 
    WScript.Sleep 500
    WshShell.SendKeys "e " 
    WScript.Sleep 500
    WshShell.SendKeys "Y" 
    WScript.Sleep 500
    WshShell.SendKeys "o"  
    WScript.Sleep 500
    WshShell.SendKeys "u " 
    WScript.Sleep 500
    WshShell.SendKeys "f" 
    WScript.Sleep 500
    WshShell.SendKeys "r" 
    WScript.Sleep 500
    WshShell.SendKeys "e" 
    WScript.Sleep 500
    WshShell.SendKeys "a" 
    WScript.Sleep 500
    WshShell.SendKeys "k"  
    WScript.Sleep 500
    WshShell.SendKeys "e" 
    WScript.Sleep 500
    WshShell.SendKeys "d " 
    WScript.Sleep 500
    WshShell.SendKeys "o" 
    WScript.Sleep 500
    WshShell.SendKeys "u" 
    WScript.Sleep 500
    WshShell.SendKeys "t"  
    WScript.Sleep 500
    WshShell.SendKeys "?"
    
  • Save the file with "autotype.vbs" (i.e. file with any name with extension .vbs)
  • Open this file to run the trick.

Simple Message Box to annoy your friends using VBScript

VBScript (Visual Basic Script) is a scripting language developed by Microsoft. It is a lightweight Active Scripting Language with a very fast interpreter.


Here is a very simple VBScript code to annoy your friends. This code will pop up an annoying message box again and again. Here are the steps:

a) Type the following code in notepad:

msgbox("Hello There!")
do
msgbox("Hello again!")
loop

b) Save this as "CoolMsgBox.vbs" (with quotes i.e. a file named CoolMsgBox with extension .vbs)

c) Double Click on this file to view the Message Box.

HOW TO STOP THIS SCRIPT:

a) Open Task Manager. (Ctrl + Shift + Esc)

b) Click on Processestab.

c) Look for a process named 'wscript.exe' , click on it and Click End Process.

d) Click End Process again in the dialog box 'Do you want to end the process wscript.exe?' and the job is done.

Why start with Java?

How to start programming? What programming language should be started as an amateur? These are the questions which arise in the minds of all those who want to learn coding more so because they are usually being fed with C++ at their academic level. Every language has its own benefits and problems but I believe Java should be the language which we should start with. Following are my reasons:


a) Java is an Object Oriented Programming (OOP) Language:

You may have heard the term OOP many times but may not be completely aware of its meaning. In the layman's terms OOP means you can compare Java to a real world object. An object, for example a car has its own set of properties like color, model etc. same is the case for a Java object, it has its own set of properties and functions.

b) Java is easier to code in:

Java is precise and easy to learn. To make a simple Window frame you need to code less than 5 lines in Java while you code more than 25 lines in C++. Leave aside the number of lines, the bottom line is you can easily understand Java code.

c) Java is Open Source:

Source code of almost all standard and non standard Java libraries is readily available on the internet and is also bundled with the Java Development Kit (JDK).

d) Java is cross platform:

While an executable (.exe) program made using C++, C# or C works only on Windows your Java code can run on any platform be it Linux, Unix etc. You name the platform and you run Java on it.

e) Java's scope is wide:

If you learn Java thoroughly you can be sure that you've almost learnt C# and C++ (you'll take a day or so and start coding in C# if you know Java). 
Every Android Application is coded in Java.
Add your favorite Softwares and links to your Desktop Context Menu (Right Click Menu)

You keep your favorite programs and links on your desktop, pinned to your taskbar but what if you like or use something as frequently as your right click? Everyone would want to add their favorite programs to their Right Click (Context) Menu on your desktop.

Edit your Context Menu


Windows does not normally have an option to add or delete entries from the right click menu but there is always a way.

There are two ways to do the same :
a) Use FContext Tweaker. (Very easy)
b) Use Registry Editor. (A bit advanced)

Let us go by the easy one for now (advanced will be discussed in some later post). Here are the steps:

a) Download FContext Tweaker from http://sourceforge.net/projects/fcontexttweaker/ (Only about 1.2 MB)

b) Open the downloaded software.

c) Go to Tweak > Desktop Context Menu > Add Custom Items.

Tweak > Desktop Context Menu > Add Custom Items


d) In the Add Program tab click on the '...' button next to Command.

Add Custom Items


e) Browse for the Executable (.exe) file of your favorite application.

f) Click on '...' near Icon and browse for the Icon file (.ico) only if you want to add a custom icon (leave whatever comes in that field if you want to use the default icon of the program).

g) In the Text enter the name that you want to see for your favorite program.

h) In Position select the Position (Top, Center or Bottom) according to your pref.

i) Tick on the Extended <Shift+Click> if you want the program to appear only when you right click the desktop while pressing Shift Key.

j) Click on Add Program button and your program will be added successfully. 

Click Add Program

Item added successfully.


See the added 'Music Player' Option


HOW TO REMOVE AN ADDED PROGRAM:

a) Go to Tweak > Desktop Context Menu > Current Items.

b) Select the Program you want to remove from the list and click the Delete Button to delete it.


Deleting Item

P.S.: FContext Tweaker is tested on Windows Vista, Windows 7 and Windows 8.

Change the Icon of Your Flash Drive (Pen Drive)

Change the icon of your flash drive (SD Card or Pen Drive) such that it appears the way you wish it to appear on every computer you plug in the device to. 

Follow these simple steps : 

1) Take any icon file (a file which has a .ico extension) you want to see as your flash drive icon and rename it to "flashicon.ico" 

2) Copy this file to your flash drive.

3) Open Notepad and type the following :
  
  [autorun]
  icon=flashicon.ico

4) Save the file as "autorun.inf" (with quotes i.e. a file named autorun with extension as .inf) directly in your flash drive.

5) Now go to your flash drive and hide both these files i.e. "flashicon.ico" and "autorun.inf".

6) Eject your flash drive and plug it in again to see your desired icon.

P.S. - In case you don't know what is a .ico (icon) file you can download free icons from http://www.iconspedia.com or you can re-size your own desired image (jpeg or preferably png)  to 32 x 32 pixels or 64 x 64 pixels and save it as an icon (.ico) file using Photoshop or GIMP.